前言
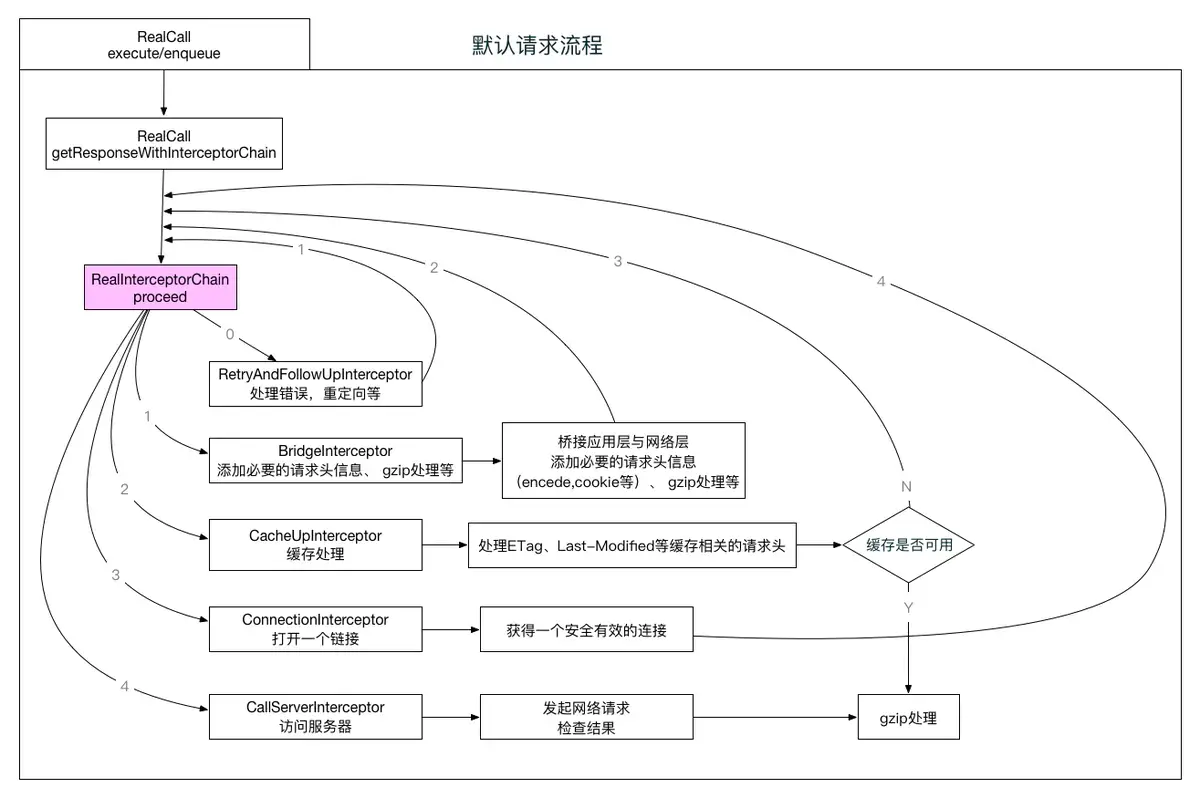
在OkHttp3中,其灵活性很大程度上体现在可以拦截 其任意一个环节,而这个优势便是okhttp3整个请求响应架构体系的精髓所在,先放出一张主框架请求流程图,接着再分析源码
OKHttp简单用例
 1
 2
 3
 4
 5
 6
 7
 8
 9
10
11
12
13
14
15
16
17
| String url = "http://wwww.baidu.com";
OkHttpClient okHttpClient = new OkHttpClient();
final Request request = new Request.Builder()
.url(url)
.build();
Call call = okHttpClient.newCall(request);
call.enqueue(new Callback() {
@Override
public void onFailure(Call call, IOException e) {
Log.d(TAG, "onFailure: ");
}
@Override
public void onResponse(Call call, Response response) throws IOException {
Log.d(TAG, "onResponse: " + response.body().string());
}
});
|
首先我们来看OkHttpClient的部分源码
1
2
3
| public OkHttpClient() {
this(new Builder());
}
|
Builder是其内部静态类,它的构造方法如下
 1
 2
 3
 4
 5
 6
 7
 8
 9
10
11
12
13
14
15
16
17
18
19
20
21
22
23
24
25
26
| public Builder() {
dispatcher = new Dispatcher();
protocols = DEFAULT_PROTOCOLS;
connectionSpecs = DEFAULT_CONNECTION_SPECS;
eventListenerFactory = EventListener.factory(EventListener.NONE);
proxySelector = ProxySelector.getDefault();
if (proxySelector == null) {
proxySelector = new NullProxySelector();
}
cookieJar = CookieJar.NO_COOKIES;
socketFactory = SocketFactory.getDefault();
hostnameVerifier = OkHostnameVerifier.INSTANCE;
certificatePinner = CertificatePinner.DEFAULT;
proxyAuthenticator = Authenticator.NONE;
authenticator = Authenticator.NONE;
connectionPool = new ConnectionPool();
dns = Dns.SYSTEM;
followSslRedirects = true;
followRedirects = true;
retryOnConnectionFailure = true;
callTimeout = 0;
connectTimeout = 10_000;
readTimeout = 10_000;
writeTimeout = 10_000;
pingInterval = 0;
}
|
我们再来看newCall方法中发生了什么
1
2
3
4
5
6
| /**
* Prepares the {@code request} to be executed at some point in the future.
*/
@Override public Call newCall(Request request) {
return RealCall.newRealCall(this, request, false /* for web socket */);
}
|
1
2
3
4
5
6
| static RealCall newRealCall(OkHttpClient client, Request originalRequest, boolean forWebSocket) {
// Safely publish the Call instance to the EventListener.
RealCall call = new RealCall(client, originalRequest, forWebSocket);
call.eventListener = client.eventListenerFactory().create(call);
return call;
}
|
我们调用Call的enqueue、execute其实都是最终调用RealCall 的enqueue、execute,下面我们来看它的源码实现
 1
 2
 3
 4
 5
 6
 7
 8
 9
10
11
12
13
14
15
16
17
18
19
20
21
22
23
24
25
26
27
28
29
30
31
| @Override public void enqueue(Callback responseCallback) {
synchronized (this) {
if (executed) throw new IllegalStateException("Already Executed");
executed = true;
}
captureCallStackTrace();
eventListener.callStart(this);
client.dispatcher().enqueue(new AsyncCall(responseCallback));
}
@Override public Response execute() throws IOException {
synchronized (this) {
if (executed) throw new IllegalStateException("Already Executed");
executed = true;
}
captureCallStackTrace();
timeout.enter();
eventListener.callStart(this);
try {
client.dispatcher().executed(this);
Response result = getResponseWithInterceptorChain();
if (result == null) throw new IOException("Canceled");
return result;
} catch (IOException e) {
e = timeoutExit(e);
eventListener.callFailed(this, e);
throw e;
} finally {
client.dispatcher().finished(this);
}
}
|
这里可以看到最后都会调用OkHttpClient实例中初始化的Dispatcher实例里的enqueue、executed。下面我们着重说明Dispatcher是什么以及有什么作用
Dispatcher
Dispatcher是一个任务调度器,它的主要作用有如下几点:
- 控制异步请求最大并发数和同一主机的请求连接数
- 执行同步和异步请求的分发
- 执行同步和异步请求的结束处理
Dispatcher部分源码如下:
 1
 2
 3
 4
 5
 6
 7
 8
 9
10
11
12
13
14
15
16
17
18
19
20
21
22
23
24
25
26
27
28
29
30
31
32
33
34
35
36
| public final class Dispatcher {
//请求默认最大并发数
private int maxRequests = 64;
//同一主机最大连接数
private int maxRequestsPerHost = 5;
private @Nullable Runnable idleCallback;
/** 异步请求线程池 */
private @Nullable ExecutorService executorService;
/** 异步请求准备队列 */
private final Deque<AsyncCall> readyAsyncCalls = new ArrayDeque<>();
/** 异步请求运行时队列 */
private final Deque<AsyncCall> runningAsyncCalls = new ArrayDeque<>();
/** 同步请求运行队列*/
private final Deque<RealCall> runningSyncCalls = new ArrayDeque<>();
public Dispatcher(ExecutorService executorService) {
this.executorService = executorService;
}
public Dispatcher() {
}
public synchronized ExecutorService executorService() {
if (executorService == null) {
executorService = new ThreadPoolExecutor(0, Integer.MAX_VALUE, 60, TimeUnit.SECONDS,
new SynchronousQueue<Runnable>(), Util.threadFactory("OkHttp Dispatcher", false));
}
return executorService;
}
.....
.....
}
|
控制异步请求最大并发数和同一主机的请求连接数
从上面RealCall 的异步请求源码可以看到请求时,实例化了一个AsyncCall
1
2
3
4
5
6
7
8
9
| @Override public void enqueue(Callback responseCallback) {
synchronized (this) {
if (executed) throw new IllegalStateException("Already Executed");
executed = true;
}
captureCallStackTrace();
eventListener.callStart(this);
client.dispatcher().enqueue(new AsyncCall(responseCallback));
}
|
AsyncCall是RealCall的一个内部类,其源码如下
 1
 2
 3
 4
 5
 6
 7
 8
 9
10
11
12
13
14
15
16
17
18
19
20
21
22
23
24
25
26
27
28
29
30
31
32
33
34
35
36
37
38
39
40
41
42
43
44
45
46
47
48
49
50
51
52
53
54
55
56
57
58
59
60
61
62
63
64
65
66
67
68
| final class AsyncCall extends NamedRunnable {
private final Callback responseCallback;
AsyncCall(Callback responseCallback) {
super("OkHttp %s", redactedUrl());
this.responseCallback = responseCallback;
}
String host() {
return originalRequest.url().host();
}
Request request() {
return originalRequest;
}
RealCall get() {
return RealCall.this;
}
/**
* Attempt to enqueue this async call on {@code executorService}. This will attempt to clean up
* if the executor has been shut down by reporting the call as failed.
*/
void executeOn(ExecutorService executorService) {
assert (!Thread.holdsLock(client.dispatcher()));
boolean success = false;
try {
executorService.execute(this);
success = true;
} catch (RejectedExecutionException e) {
InterruptedIOException ioException = new InterruptedIOException("executor rejected");
ioException.initCause(e);
eventListener.callFailed(RealCall.this, ioException);
responseCallback.onFailure(RealCall.this, ioException);
} finally {
if (!success) {
client.dispatcher().finished(this); // This call is no longer running!
}
}
}
@Override protected void execute() {
boolean signalledCallback = false;
timeout.enter();
try {
Response response = getResponseWithInterceptorChain();
if (retryAndFollowUpInterceptor.isCanceled()) {
signalledCallback = true;
responseCallback.onFailure(RealCall.this, new IOException("Canceled"));
} else {
signalledCallback = true;
responseCallback.onResponse(RealCall.this, response);
}
} catch (IOException e) {
e = timeoutExit(e);
if (signalledCallback) {
// Do not signal the callback twice!
Platform.get().log(INFO, "Callback failure for " + toLoggableString(), e);
} else {
eventListener.callFailed(RealCall.this, e);
responseCallback.onFailure(RealCall.this, e);
}
} finally {
client.dispatcher().finished(this);
}
}
}
|
NamedRunnable 这里不做过多的介绍,你只需要只要这是一个实现了Runnable接口的抽象类即可。
下面我们来看Dispatcher中enqueue方法源码
1
2
3
4
5
6
7
| void enqueue(AsyncCall call) {
synchronized (this) {
//加入准备队列
readyAsyncCalls.add(call);
}
promoteAndExecute();
}
|
 1
 2
 3
 4
 5
 6
 7
 8
 9
10
11
12
13
14
15
16
17
18
19
20
21
22
23
24
25
26
27
28
29
30
| private boolean promoteAndExecute() {
assert (!Thread.holdsLock(this));
List<AsyncCall> executableCalls = new ArrayList<>();
boolean isRunning;
synchronized (this) {
for (Iterator<AsyncCall> i = readyAsyncCalls.iterator(); i.hasNext(); ) {
AsyncCall asyncCall = i.next();
//是否超过最大并发数
if (runningAsyncCalls.size() >= maxRequests) break;
// 判断同一主机是否大于的指定最大连接数
if (runningCallsForHost(asyncCall) >= maxRequestsPerHost) continue;
//如果满足执行条件,从准备队列中移除
i.remove();
//添加到异步请求运行队列中
executableCalls.add(asyncCall);
runningAsyncCalls.add(asyncCall);
}
//判断运行队列中是否还有任务
isRunning = runningCallsCount() > 0;
}
//遍历异步请求队列,加入异步请求线程池中运行
for (int i = 0, size = executableCalls.size(); i < size; i++) {
AsyncCall asyncCall = executableCalls.get(i);
asyncCall.executeOn(executorService());
}
return isRunning;
}
|
到了这边就可以看到了Dispatcher的第一个功能,控制异步请求最大并发数和同一主机的请求连接数
执行异步请求和同步请求的分发
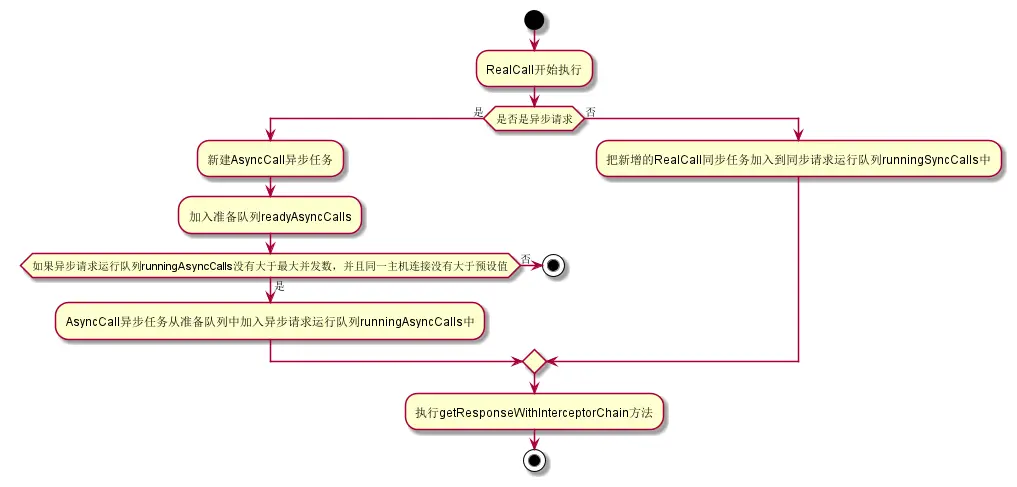
从上面异步请求的源码可以分析出Dispatcher异步请求分发的流程,如下:
- RealCall 的enqueue方法中生成一个AsyncCall异步任务
- Dispatcher执行enqueue方法把AsyncCall异步任务加入到准备队列中
- 循环准备队列,判断异步请求运行队列是否大于最大并发数,大于则直接终止流程,等待异步请求运行队列空闲时再次触发执行。
- 小于最大并发数,则判断异步请求运行队列同一主机的连接数是否大于预设值,大于跳过此次请求任务,继续从准备队列中循环下一个请求任务。
- 异步请求运行队列同一主机的连接数小于预设值,则把AsyncCall异步任务从准备队列中删除,并加入异步请求运行队列中等待执行
下面我们再来深入RealCall 中同步请求execute方法的源码:
 1
 2
 3
 4
 5
 6
 7
 8
 9
10
11
12
13
14
15
16
17
18
19
20
21
| @Override public Response execute() throws IOException {
synchronized (this) {
if (executed) throw new IllegalStateException("Already Executed");
executed = true;
}
captureCallStackTrace();
timeout.enter();
eventListener.callStart(this);
try {
client.dispatcher().executed(this);
Response result = getResponseWithInterceptorChain();
if (result == null) throw new IOException("Canceled");
return result;
} catch (IOException e) {
e = timeoutExit(e);
eventListener.callFailed(this, e);
throw e;
} finally {
client.dispatcher().finished(this);
}
}
|
1
2
3
4
| /** Used by {@code Call#execute} to signal it is in-flight. */
synchronized void executed(RealCall call) {
runningSyncCalls.add(call);
}
|
可以看到这边则非常简单,直接把同步任务加入同步请求队列runningSyncCalls中
执行同步和异步请求的结束处理
从上诉promoteAndExecute方法中可以看到异步任务都会走AsyncCall 的executeOn方法,而executeOn最终会执行到自身的execute方法,而无论execute执行成功与否都会执行Dispatcher的finished。
从上面RealCall 中的同步方法可以看到最后都会执行Dispatcher的finished。那么我们就有必要对这个方法进行进一步的剖析
 1
 2
 3
 4
 5
 6
 7
 8
 9
10
11
12
13
14
15
16
17
18
| /** Used by {@code Call#execute} to signal completion. */
void finished(RealCall call) {
finished(runningSyncCalls, call);
}
private <T> void finished(Deque<T> calls, T call) {
Runnable idleCallback;
synchronized (this) {
if (!calls.remove(call)) throw new AssertionError("Call wasn't in-flight!");
idleCallback = this.idleCallback;
}
boolean isRunning = promoteAndExecute();
if (!isRunning && idleCallback != null) {
idleCallback.run();
}
}
|
可以看到Dispatcher的finished方法中最后又会调到promoteAndExecute,前面分析了Dispatcher异步请求流程,如果循环异步请求准备队列,异步请求循环队列大于最大并发数或者同一主机的连接数大于预设值。则放弃处理,直至异步请求运行队列空闲时再次触发。而怎么触发,就是在这边触发的。
同时这个函数还会返回一个结果,告知是否有请求任务正在运行。判断是否有运行中队列通过以下方法实现
1
2
3
4
| public synchronized int runningCallsCount() {
//返回同步请求队列和异步请求队列总和
return runningAsyncCalls.size() + runningSyncCalls.size();
}
|
如果没有任务正在运行,并且设置了idleCallback回调,则会触发idleCallback回调,触发后续的操作。
OkHttp框架的拦截方法
就如文章一开头那张总图概括,无论是同步请求或者异步请求,通过上面的源码分析,可以发现最后都会走一个叫getResponseWithInterceptorChain的方法。下面我们来看看这个方法的实现
 1
 2
 3
 4
 5
 6
 7
 8
 9
10
11
12
13
14
15
16
17
18
19
20
21
22
23
24
25
26
| Response getResponseWithInterceptorChain() throws IOException {
// 拦截器链
List<Interceptor> interceptors = new ArrayList<>();
//用户自定义的拦截器
interceptors.addAll(client.interceptors());
//报错重试、重定向拦截
interceptors.add(retryAndFollowUpInterceptor);
//桥接拦截器,桥接应用层与网络层,添加必要的头
interceptors.add(new BridgeInterceptor(client.cookieJar()));
//缓存拦截器
interceptors.add(new CacheInterceptor(client.internalCache()));
//连接拦截器
interceptors.add(new ConnectInterceptor(client));
//从这就知道,通过okHttpClient.Builder#addNetworkInterceptor()传进来的拦截器只对非网页的请求生效
if (!forWebSocket) {
interceptors.addAll(client.networkInterceptors());
}
//请求拦截器,这里执行真正的网络请求
interceptors.add(new CallServerInterceptor(forWebSocket));
Interceptor.Chain chain = new RealInterceptorChain(interceptors, null, null, null, 0,
originalRequest, this, eventListener, client.connectTimeoutMillis(),
client.readTimeoutMillis(), client.writeTimeoutMillis());
return chain.proceed(originalRequest);
}
|
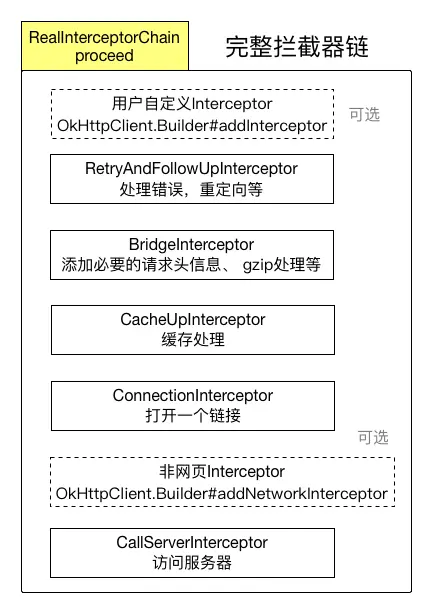
这里不做具体拦截器的源码分析,感兴趣的同学自己去深入